The most effective way to repurpose your online video is to simply turn video into a blog post. It takes a lot of work in creating video content. But what about repurposing video for written content, another potent internet format? There is a method for that as well.
Your own existing video material is a terrific place to start if you’re looking for content ideas for your blog, Substack, or even a company website. I’ll explain how to create videos to text in this article so you can quickly turn any YouTube video into a blog post.
“If You want to Remove AI Detection and Bypass AI Detectors Use undetectable AI: It can do it in one click“
Turn a Video into a Blog Post in 4 Steps
To turn your video into text blog post, follow these crucial steps:
1. Select a Video to Turn into a Blog
Check your YouTube analytics first to check which videos have been performing well lately. These stats are a good sign of which themes resonate with your target audience, even though they are not a perfect predictor of what will perform well on your blog.

Once you’ve selected the top two or three subjects, you should conduct some SEO research. Put those themes into a keyword research tool like Moz or SEMrush to get a decent understanding of what people are looking for and how challenging it will be to rank for those search phrases.
2. View the Transcription of the Video Page

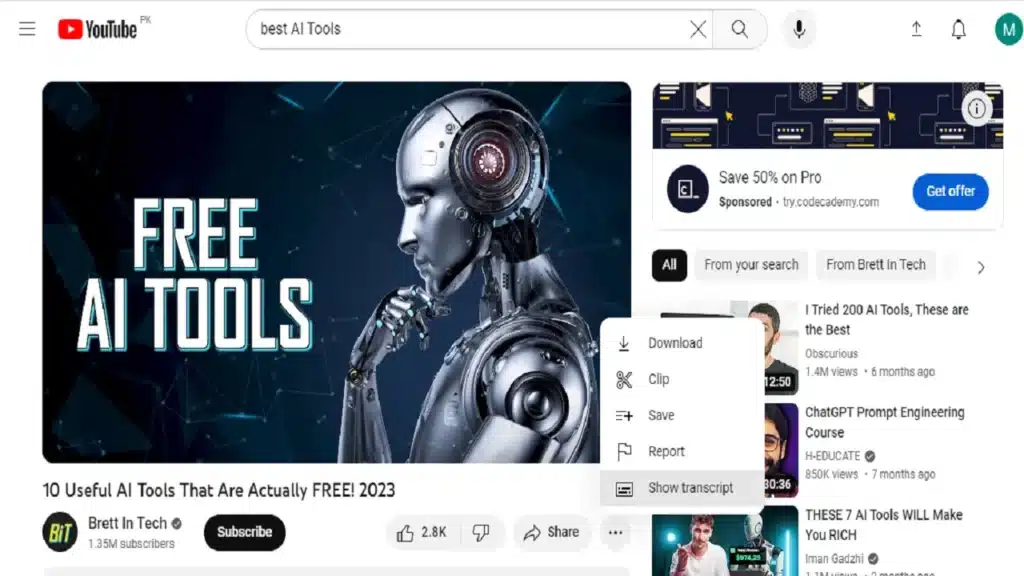
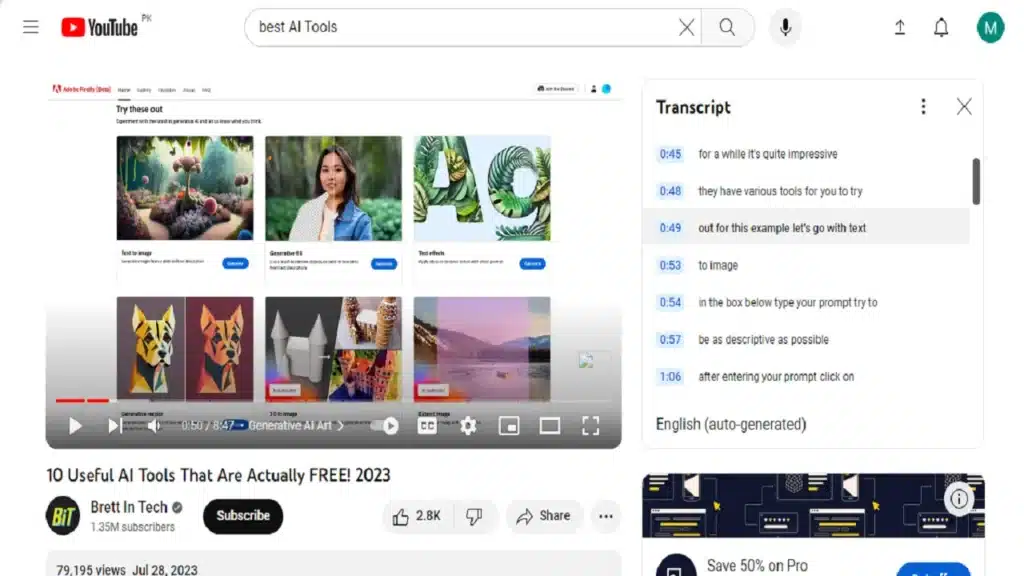
Click on Open transcript from the three tiny dots that appear beneath the video once the YouTube video page has loaded. YouTube does a good job of producing the transcript / subtitle for your video.
Being generally rather precise, it’s perfect for you to employ. While there might be the occasional misspelling, overall, it’s a reasonably accurate transcript.
Adjust the Time Stamps and Copy the Transcript

By clicking the three dots in the top right corner of the transcript, you can turn off timestamps. You shouldn’t include the timestamps from your transcripts in your blog post because they won’t be visible.
This transcript will now serve as the basis for your blog entry. Since you already have the content and have covered everything in your video, you can easily turn it into a blog post. Ctrl+C will select all of the text in this transcript and copy it.
Start a fresh Google Docs document. Using the right-click menu, paste the text without formatting.
Use Add-On in Google Docs to Remove Paragraphs

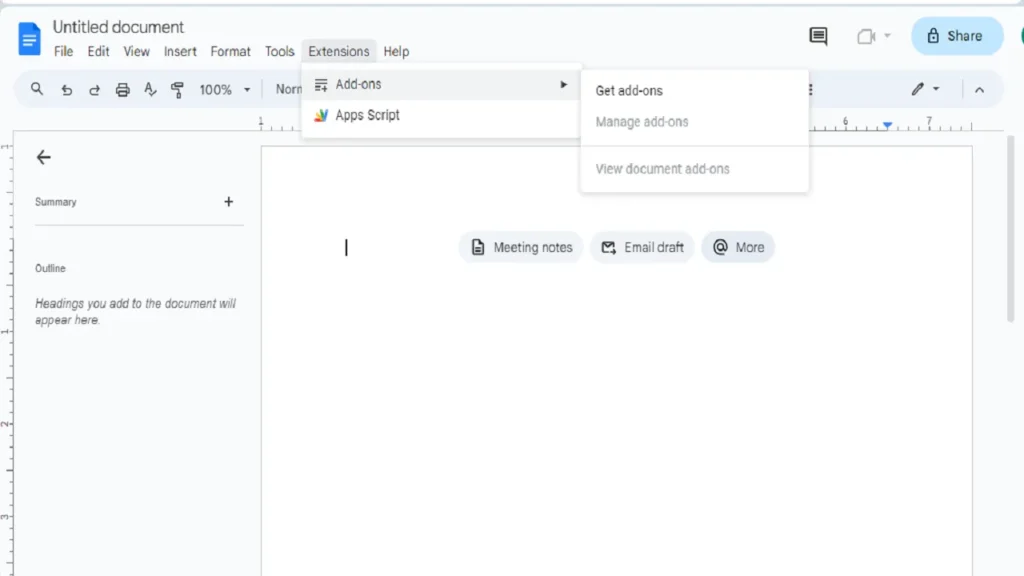
In Google Docs, select Add-ons from the top menu. Click Get add-ons to download the Text Cleaner add-on into Google Docs. By simply following these easy steps, you can effortlessly clean up that txt.
It’s quite easy to achieve that using this add-on. Choose your text and select Add-ons, Text cleaner, then Remove paragraph breaks after installing the add-on. All of your text’s paragraph breaks will be removed after a brief interval.
Utilize the Find and Replace Tool

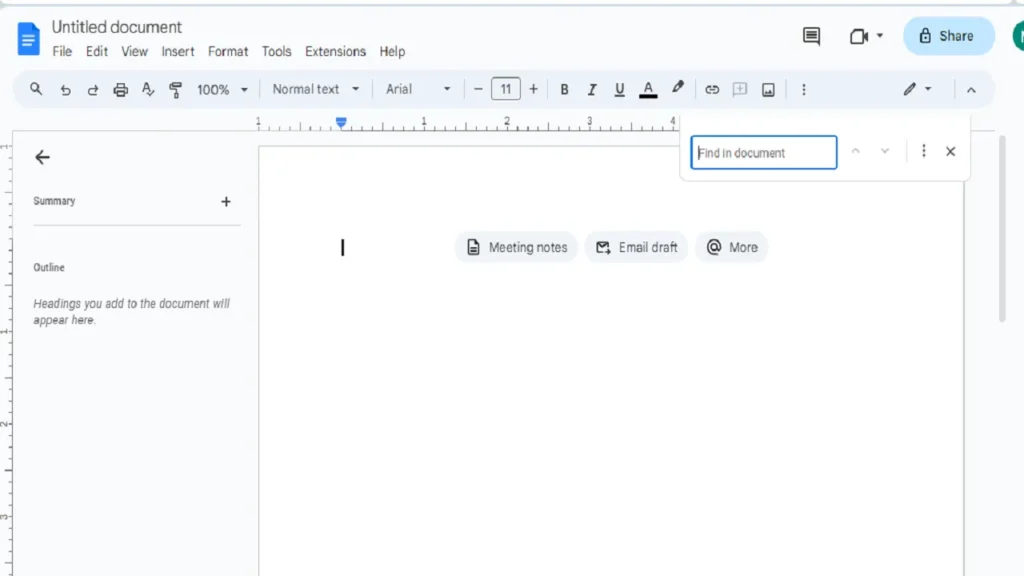
Use the Find and Replace tool in Google Docs. By hitting Ctrl+F, the find feature will be available. This is quite useful because you might want to edit a few words in this text. It’s possible that the words need to be capitalized, spelt differently, or removed entirely.
Rather than having to read the full text, it will be easier to replace all of those at once. For Example you might want to change:
Replace “i” with I, replace “i’m, i’ve” with “I’m, I’ve”, or replace “youtube, instagram etc” with “YouTube, Instagram etc.”
3. Go over the Text and Tidy up the Paragraphs
Organize your content into phrases and paragraphs based on how you want it to appear in your blog post. You can add a hook or a different introduction. Include elements that will improve your Google search ranking.
Arrangement of Headings and Paragraphs
The paragraphs and headings in your post have a significant impact on how your blog post appears in search results. First of all, Google is conscious of the fact that well-formatted paragraphs facilitate reading text. Headings in blog post increases its readability.
Google uses headers as a critical tool for comprehending the content of your material in order to know how to index it. Make use of headers and subheadings in your blog posts. For this reason, it is essential to include a title and headers marked by H tags (H1, H2, H3, etc.).
Links or affiliate links should be included in your blog post. Use headings to highlight main points and use bullet points to produce best content. Finally, skim through everything to ensure that it all makes sense.
Embedding Video in Blog Post

Ensure sure the video is prepared correctly and actually embeds into the new blog post. Additionally, adding video Meta tags is a fantastic way to enhance search optimization. By doing this, you can be sure that Google will crawl your blog post and find the video there. Now, the blog post will appear in the Google video search results.
Adding a Meta Description
You should use a tool like Yoast for WordPress or include a brief description of your video or blog post to the head section of your website. This is the excerpt that appears in social media previews or search results. Make sure you use the exact phrase associated with the SEO keyword you’re going for.
4. Publishing the Post in Content Management System
The last step upload post to your content management platform like WordPress, Webflow, SquareSpace, etc. Make any last-minute changes that are required.
Why Convert Video to Blog Post: Blog Posts on Facebook
Have you ever attempted to share a YouTube video on Facebook? Is it not difficult? Why is it the case? It receives little traffic as a result of Facebook’s aversion to YouTube videos using on their channel.
However, you may publish that blog article on your Facebook page, which will improve the video’s visibility, if you convert it into a video and embed it there. Additionally, you can pay to have that blog article magnified, unlike with a YouTube video.
The decision to read rather than watch could also be made by certain people. Yes, some people will go to your website after seeing you on YouTube, while others will go to YouTube after seeing you there. Why not meld the two?
Key Points
Naturally, the process of going through and editing the raw transcript into a beautifully formatted blog post still takes time. However, it does go much faster than starting from scratch. Working smarter, not harder, is the key to turning your YouTube videos into blog posts.
All types of online tools video material, including explainers, interviews, talking head videos, and webinars, can be produced using this method. Even better, you can write a blog post from your podcast by having it transcribed.
Frequently Asked Questions – How to Turn Video into a Blog Post
Can I Use My YouTube Video for Blog Post?
Yes, of course. To make your blog entries more visible in Google and to attract additional channel subscribers from your website, you can incorporate your own YouTube videos. Use to transform your content as many various ways as you can and always cross-promote it.
How can I turn a YouTube video into a blog post?
If you want to turn a YouTube video into a blog post, you can start by embedding the video in your blog post. You can do this by copying the embed code provided by YouTube and pasting it into your blog editor. This way, your readers can watch the video directly on your blog.
Can I turn a blog post into videos?
Absolutely! You can convert your blog posts into entire video to reach more people and repurpose your content marketing. To do this, you can create a video script knowledge base on your blog post and use a video editing software to turn it into an engaging video. You can then upload the video to platforms like YouTube and embed it back into a new blog post.
Are there any SEO considerations when turning a video into a blog post?
Yes, there are some important SEO considerations when turning a video into a blog post. Firstly, make sure to provide a transcript of the video in the blog post. Search engines can’t directly crawl video content, so having a transcript helps them understand the context. Additionally, optimize your blog post’s Meta tags, keyword placement, and blog content structure to improve its search engine visibility.
How do I embed a video into a WordPress blog post?
Embedding a video into a WordPress blog post is easy. First, go to your YouTube video production and click on the “Share” button. Then, click on “Embed” and copy the provided code. Lastly, go to your WordPress editor and switch to the “Text” mode. Paste the code where you want the video to appear in your blog post and then switch back to the “Visual” mode to see the video.
Can I use video content from other sources in my blog posts?
Yes, you can definitely use free video content from other sources in your blog posts. However, it’s important to give proper credit and follow any licensing restrictions. You can embed videos from platforms like YouTube or Vimeo, as long as the content owner allows embedding.


How To Make ChatGPT Write Longer?
November 11, 2023[…] length is limited, you can make ChatGPT write longer responses—enough for essays, articles, blog posts, research papers, and even entire books—by providing it with the correct prompts and […]